So it's official. Worst blogger of all time. Sorry y'all. Got a new job and life got busy and have been totally terrible about blogging. And here's a new one- but no pics. Yet. Maybe I'll make it for the Super Bowl this weekend and will sneak in some pics later. Maybe? We'll see. In any event- let's get back to it...
Most of the time, I think I'd be perfectly content living life as a vegetarian. And then I eat something that's absolutely beyond delicious, like roast chicken with sherry-thyme pan sauce (recipe coming soon) or buffalo chicken dip and I think - no way, what a terrible idea. I've been meaning to post this recipe for awhile now (sorry I didn't get it up in time for playoff snacks), but I wanted to make sure that if you had a Super Bowl party to attend this year (Go Pats!), you'd have a tasty go-to snack to impress your friends and family. And let's face it- buffalo chicken dip is practically irresistible. (Yes, obviously it's totally unhealthy, but I'm pretty sure calories consumed over Super Bowl weekend don't count. And if you're still clinging on to a New Years resolution, most ingredients in the recipe have low-fat alternatives- so feel free to use them if you can find 'em). The recipe that follows is a combination of several recipes I've used over the years. First, a brief note. If you Google this recipe, most of what comes back involves canned chicken. I have one thing to say about that: sick. I'm sorry- I'm sure it's easy, or saves time, or who knows what... but honestly. Canned chicken. Canned meat in general. I mean, really. Just don't. So gross. Here's my version:
1 c. cooked, shredded chicken (if you don't have time to bake/grill the chicken, get a rotisserie- one breast should yield just about enough meat)
1 c Franks hot sauce (or hot buffalo sauce)
1 c ranch dressing (you can also use bleu cheese dressing, but people can be weird about bleu cheese, so ranch is usually a safer bet)
1 celery rib, minced
2 8 oz packages cream cheese (or neufchatel, if you're going low fat), room temp--room temp is important or it will be hard to mix in with the rest of the ingredients
2 c grated/shredded cheddar cheese
The amazing thing about this recipe (aside from how delicious the finished product is) is that once you round up the ingredients, you're basically ready to bake it. But here are a few steps.
1. Preheat oven to 350.
2. Dice/mince celery rib. If you don't have celery, it isn't a must-have, but the little bit of a crunch provides a nice contrast to the creaminess of everything else.
3. In a medium-sized bowl, stir together softened cream cheese, cheddar cheese (reserve 1/4 of the cheddar for the top of the dip), hot sauce, ranch dressing, celery and chicken.
4. Transfer to oven-safe baking dish, sprinkle top with remaining 1/4 cheddar cheese and bake, covered in foil, for 30 minutes (or until heated through and cheese on top bubbles).
Serve with tortilla chips, carrots or celery sticks. Of course you'll be out of chips first. (Though I think that goes without saying). And there you have it- an easy, crowd-pleasing recipe for buffalo chicken dip. If I can keep people out of it for long enough, I'll try to snap some pics.
And since the Falcons are out of the running... go Pats!!
Friday, February 3, 2012
Tuesday, November 22, 2011
To brine, or not to brine?
 |
| Incidentally, this is actually a chicken I recently brined before roasting. But you get the idea. |
Turkey day grows closer by the second (hooray!) and if you're like me, you're busy dreaming about how delicious the day's feast will be. Since heading home to the newly-minted Peachtree Corners (go, Mom!) for the day is a bit of a hike (Mr Turvy has to work on Friday- ugh!), we'll be sticking around Boston to celebrate Thanksgiving with my in-laws. They're cooking for a crowd and I've volunteered to bring mashed potatoes (surprise, surprise) and my grandma's butterhorn rolls (recipes to follow). Has anyone had butterhorns before? They're a bit of a hassle to make but are buttery and sweet and delicious and well worth the effort.
Several years ago, I cottoned on to the idea of brining a turkey. If you've never had the pleasure of brining a turkey before- DO. IT. THIS. YEAR. (I'm giving you a few days head start to assemble everything you'll need). Seriously, you won't regret it. When I first brined a turkey for my family's Thanksgiving a few years ago, it blew our minds. I'm not exaggerating, either. For the first time in the history of Thanksgiving turkeys, this one was melt-in-your-mouth juicy and we couldn't get enough. That go-round, I used this recipe for Herb-Roasted Turkey from my favorite of favorite cooking websites, Epicurious. I used the herb butter and basted with chicken stock and pan juices instead of apple cider and didn't end up making the apple cider grazy.
A few tips for cooking your bird:
-The brining process can take up to 48 hours, so get started asap! You need at least 15-18 hours to brine the turkey and at least twelve hours afterwards for it to sit on a rack in your fridge, uncovered
-When you brine, it helps to put the brine mixture and the turkey in a small (like the ones for a bathroom sized garbage can) garbage bag tied at the top so no liquid can escape and do all of this inside a stockpot
-Remove the little white temperature thing that pops out (which I neglected to do on the above chicken). It isn't always so helpful at giving an accurate temperature reading.
-A word to the wise, cooking stuffing inside of a brined turkey can make things awfully salty, so make an extra batch of stuffing to cook independently of the bird (and mix the two together). And if you're cooking stuffing inside of the bird, inserting it en masse into a cheesecloth (tied at the top) will make it infinitely easier to scoop out of the cavity once the turkey is done.
-If the turkey breast/tips of wings and feet start looking too brown, pop on some aluminum foil to nip the browning in the bud.
-If your turkey doesn't come with one of those metal things to hold its feet together, find some string and tie them yourself. And if you're really feeling fabulous, give your turkey fancy booties that look like chef hats
 |
| Tres chic. Your fancy friends will be impressed. |
Any questions?
Since I still have beaucoup de time on my hands, in addition to a crockpot curried chicken for dinner (recipe to be posted later- provided it turns out), I've gotten a jump on Thursday's mashed potatoes. It's hard to keep up the potato fluffiness by fixing them two days in advance, but you can roast the garlic ahead of time with no adverse effects. (A head of roasted garlic can be refrigerated for a week in an airtight container). Roasting garlic takes about 40 minutes in a 400 degree oven and is easy-peasy if you follow these steps.
Roasting garlic in 5 easy steps
1. Set your oven to 400 degrees
2. Peel some of the excess layers of skin off the head of garlic, so it looks like this

and lop off the tip of your head of garlic to make it easier to rescue the cloves once it's roasted, comme ca:
 | ||
| Look Ma, no tops! |
3. Place the garlic in aluminum foil, drizzle with olive oil (about 1 T) and sprinkle with salt and pepper

4. Pinch the aluminum foil closed around the top of the head of garlic and pop in the oven for 45 minutes (I like to rest the garlic atop a square of aluminum foil just in case any oil leaks out)

  |
5. Remove from the oven and enjoy. If you're using it immediately, remove individual cloves from the head using a fork. If you're using it within the week, store, cut-cloves down in olive oil in an airtight container.

Now that you've got the garlic roasting part down pat, here's the recipe for the potatoes I'll make on Thursday. These aren't exactly figure- friendly but will definitely impress your guests on special occasions.
Roasted garlic mashed potatoes with crème fraîche
Serves 8-10
4 pounds russet or yukon gold potatoes, peeled, rinsed and diced into 1/2" cubes
8 T butter, unsalted (I like to use unsalted butter to moderate the amount of salt when I'm cooking)
5 T crème fraîche
8 c water
1 head of garlic (or 12 cloves), roasted (see directions above)
1/2 c milk (use whichever milk you buy- you can use light or heavy cream if you have either handy)
Salt, to taste
Pepper, to taste
Boil 8 cups of water on high heat. Add potatoes and cook until they hold their shape but are easy to smush (not in a Jersey Shore way) or bite (about 15 minutes). Drain the potatoes (don't rinse), add garlic and mash using a mixer, old-fashioned masher, ricer (whatever gives them the texture your pretty little heart desires). Add butter, crème fraîche, milk, and salt and pepper to taste and continue to mash/stir until everything is well-blended. If you're making these ahead of time, pouring 1/4 cup milk or cream on top of the potatoes before you cover them will keep them fluffy when you need to reheat before the big feast. Hope you love these potatoes as much as I do!!
A note on the creme fraiche- un produit de France, it's relatively similar in taste and consistency to American sour cream (not quite as delicious but will work as a substitute in a pinch) and can be found in the dairy or deli section of your local grocery. You may have trouble finding it at grocery stores like Ingles, Stop & Shop and Shaws but I've had luck finding it at specialty markets, gourmet grocers and Trader Joes. I've also only ever found one brand that sells it, Vermont Butter & Cheese Creamery and it looks like this.

Happy Turkey Day, y'all!
Wednesday, November 16, 2011
Chickpea salads are for lovers
Many of you know that I've been spending lots of time chez nous these days. Not exactly my most favorite thing in the world, but to keep myself from going stir crazy, I've been doing lots of cooking. And since I'm not in the office at the moment, I'm also trying to keep the budget down so Mr Turvy doesn't pitch a fit when he comes home to find me romping around our tiny kitchen in new frocks and feather earrings. (Hence the influx of inexpensive potato dishes of late- plenty more where those came from). I have a handful of favorite lunches that won't break the bank (or induce a nap immediately afterwards). One recent fave is a chickpea and tomato salad. Chickpeas, also called garbanzo beans (by my mother and Goya brand canned products and virtually no one else) are extra high in protein and are a staple in Middle Eastern, Indian and African cooking. (They use them lots of other places, too!) Have you tried Clover Food Lab's chickpea fritter sandwich yet? Yum, yum!
In any event, I've created a tasty chickpea salad that requires minimal cooking and is easy to throw together in 5 minutes using things I almost always have on hand in the kitchen, like these guys:

You may not have all of these in your pantry, but the beauty of this recipe is that it lends itself well to substitutions. When I made this last, I used a sprinkle of ground coriander and a pinch of sumac (which I'd bought with fatoush salad in mind. But then I couldn't find a good recipe. Does anyone have one?) If you don't have either, don't fret- you can do without or add a favorite seasoning in their stead. And a word of advice when buying dried herbs and spices- look for them at specialty ethnic markets (Asian, Indian, etc) and in the "international" aisle of your local grocery store. I've found that Badia (usually in the Hispanic foods section) carries the same spices as McCormick and for a fraction of the price.
Here's a little something to look forward to...

5 Minute chickpea and tomato salad
Serves 2 (or one really hungry person who loves chickpeas)
1 can chickpeas, drained and rinsed
1 medium tomato, cored and diced
1/2 red onion, peeled and finely diced
1 T fresh parsley (I prefer flat leaf to curly), rinsed and chopped
2 T lemon juice
2 T olive oil
1/2 t salt
1 t cumin
1/2 t ground pepper (5 turns of a pepper grinder)
1/2 t red pepper flakes
sprinkle of cayenne pepper
In a bowl, combine the last eight ingredients. Add the chickpeas, tomato and red onion. Stir, add additional salt/pepper/spices to taste. Enjoy!
A few notes on the recipe:
I'm not always wild about the idea of eating onions mid-day, especially when you work in close proximity to others. Keep that in mind if you're planning on eating this dish at work. If you're particular to one kind of onion- yellow, Vidalia, red, scallion- feel free to use your fave.
Make sure to drain and rinse the chickpeas thoroughly before adding them to the dish. You can tell when the chickpeas are rinsed when the water runs clear, like this:
 |
| Get rid of those bubbles |
| There you go |
Hope you like this cheap and easy lunch. Do you have any go-to, yummy lunches that require minimal cooktime and effort?
Tuesday, November 8, 2011
The funny thing about being a kid
...is, well, pretty much everything, really. Sometimes, when I think about paying bills and doing boring adult stuff like running errands and getting the car serviced and reading a newspaper that doesn't have comics and being responsible more often than not, it reminds me how sweet we had it when we were kids.
(Plus, I'm way overdue for a new blog post. My youngest brother, aka The Backwards Boy, and I have agreed to update our respective blogs at least once a week and I've thus far done a terrible job holding up my end of the bargain. And those of you who aren't into cooking/reading about how bad I am at DIY projects might enjoy something new for a change).
Ok, back to kid stuff. (I'll see if I can't add some old pictures to this post later, but no promises). Just to get this out of the way, in pretty much the absolute nerdiest way possible, I loved school. Couldn't get enough of it. I loved reading, I loved learning new things and I loved spelling tests (probably because they were a guaranteed A). And to secure my nerd status in middle school, I was in the county spelling bee. Will have to remind myself to tell our future children of what not to do in middle school: namely pursuing activities that shore up nerd status or debuting risky new haircuts like the female bowl cut- though that's a post for another day). Back at the spelling bee, things were going gangbusters for me until I encountered the word "orthographies" and was knocked out. I'd never heard the word before and as a last ditch effort, tried to get all Spellbound on them by asking for things like language of origin and definition-clearly hadn't bothered to learn either so this wasn't exactly very helpful. Now try to imagine how hard the crowd might laugh and how your face might fall when the prompter tells you that the word you're about to misspell means "to spell correctly". Boy, did the crowd eat that up. And I know it's almost 10 years old, but if you didn't see it, do yourself a favor and rent/Netflix Spellbound immediately. One thing I didn't like about elementary school, however, was that I never seemed to be able to get my act together for homework assignments. At around 8 o'clock the night before a book report was due, for example, I'd panic; I hadn't read the book yet and I DEFINITELY hadn't started the project. Cut to me, speed-reading A Wrinkle in Time or Misty of Chincoteague and my mom helping me to sleepily scribble a poster for it at 1:00 am. Hardly ideal.
Another vivid childhood memory-riding to tennis lessons every weekend with my pal Cara. Her parents had a van that, if memory serves, was basically this exact one, called, as I discovered via that link, a Nissan Vanette. The best thing about their van was the fact that at least one of the sliding side doors was broken and would periodically fly open while you were driving, usually at high speeds. So when her parents (or, if you were really lucky, her super cool older high school brothers) picked you up, you immediately threw all of your tennis gear in the back-so it wouldn't fly out if/when the door opened en route and sat poised to use all of your nine year old might to shut the door because, let's be honest, it opened every time. It probably should have been harrowing, but I loved it when the door next to me opened and I sprang into action and held that door closed for dear life the rest of the way there. For much of our time in Ohio, I played at the same tennis facility, Olympic, which put a bubble over its courts to winterize them, something that vexed me to no end. What was the bubble made of? Where did it go in the summer? What was possibly big enough to blow it up? Maybe some things are meant to stay a mystery. There were several coaches there, but two I remember best: Winn (as a kid, it never occurred to me that this might be a nickname, I just assumed his name was Winn because he was a 'winn'er and won lots of matches), who had us hit with nerf balls before we graduated to real ones and used to hold us upside-down over the garbage cans at the net, and Steve, who made us scream "LOW TO HIGH" as we practiced our strokes and gave us posters (Andre Agassi and Jennifer Capriati were particularly sought after) for hitting the most serves in or squeezing the most balls onto our racquets during pick up. I liked Steve, he was funny and brash and encouraging, but he constantly flirted with the girls in my drill groups (I was young but played with older girls and thought this was something that older girls did. If only I'd paid attention enough to learn some sweet moves. Just going to leave the whole creepiness factor alone).
Outside of tennis (and the one million other activities I was involved in), I spent much of elementary school lobbying to get my ears pierced so that I could wear the dangliest, most glorious earrings imaginable! From the minute I realized that the Pierced Ear Club was something most of my girl classmates-and even some of the boys had already joined (and this happened sometime in kindergarten), I knew I had to get in on it. I cried. I pleaded. I appealed to my parents' sense of not wanting their favorite (and only) daughter to be a social pariah. For the record, this last approach seemed to have no effect. Apparently they didn't care that the only girls who didn't have their ears pierced were the ones who wore long skirts and turtlenecks and spent recess reading books about horses. For hours, I tallied the girls in school who had pierced ears vs. the ones who didn't and reported back to my mom; "Mo-oomm, come on! It's pretty much just me and the weird horse girls!!" (Fortunately, my elementary school was tiny or this really would have cut into my time reading biographies-phew!) Vigilantly, I kept tabs on who had recently gotten her ears pierced and who was "definitely going to in like a week because her parents are really nice and they really want her to get them pierced, she didn't even have to ask them!" Clearly, this didn't work either. One year, sick of my nagging, my mom told me that if I didn't ask about it for a year, she'd relent. (She denies the promise to this day, but she wasn't the one who had so sweetly and patiently x'd off 365 calendar days only to hear, "Well, I know you haven't asked about it in awhile, but I definitely never said that". Beyond infuriating!)
Finally, in fourth grade on my 10th birthday, she let my college-aged babysitter, Mary Kae, take me to Claire's. I picked out "diamond" studs, spent 30 days twisting them while slathering my earlobes with antiseptic and thought my heart would explode with happiness. It was only as an adult I learned that she'd only relented because I'd found a chink in her armor. Though I typically only resorted to lying 'for emergencies only', clearly this was social survival mode; I told the absolutely teensiest white lie that Cara's parents (who shared my parents' views on most things, including ear piercing) had said that she could get her ears pierced. This worked like a charm. Not so much of a charm that my mother actually agreed to take me, but well enough that Mary Kae was allowed to accompany me (since you needed someone over 18 to give permission). It bears mentioning that Mary Kae, who I practically idolized for her permed hair (another on-going battle which I ultimately lost) and off-the-shoulder sweatshirts, had a boyfriend named Donnie at the height of NKOTB popularity. And I thought that earrings like these (in nearly every store at the time) would be the perfect gift for her. Things really came full circle when, nearly 15 years later, I took my mom to Claire's for her very first ear piercing, thus ending her long run of unclipping one earring to talk on the phone and forgetting where she'd left it. Even now, like some sort of raccoon or kitten, I'm continually drawn to the dangliest, most glorious earrings imaginable. Feathers? Hoops? Shiny ones? Oui, oui.
Among other things I wanted like burning as a kid: to learn double dutch, a Skip It (remember those?) and cable tv. What was on your kid wish list and how hard did you have to work your parents to get it?
Tuesday, October 18, 2011
Welcome to fall, now let's start making (potato leek) soup
I could without a doubt live off of potatoes and nothing else. Mr Turvy shares my love for all things spud, as I discovered when he recently showed me his 6th grade yearbook. He went to a small school and each class had their own page dedicated to the students in it. His class's page began with the headline "Can you imagine...?" and was followed by lots of funny middle school class inside jokes- things like, "...Catherine M. wearing clothes that clashed", "...Danny P. being on time" "Megan R. not gossiping" annnnnnd drumroll please- "Mr Turvy not liking potatoes". Apparently he liked them so much that his whole class knew about it. So maybe it was fate? Perhaps.
In any event, I can- and will, keep the potato recipes coming. Let's say that you didn't have any russet potatoes on hand to make pommes frites last week but you do have yukon golds (or even those basic, all purpose potatoes). A great way to use some up is in a potato-leek soup- one of the most delicious, belly warming meals around. There are a number of ways to make this soup using a variety of different ingredients (so feel free to poke around online for modifications). To make my potato-leek soup, I adapted this pretty basic recipe from Epicurious, my go-to recipe/meal idea website since college. The leftovers will grow more flavorful overnight but this will make you an absolutely ENORMOUS batch of soup. However, if you aren't cooking for a tiny army (or even a grown-up sized one), you might want to halve the recipe.
Potato Leek Soup
Serves 12
2 leeks, washed and sliced
3 lbs Yukon Gold potatoes, peeled and diced
3 cloves garlic, minced
1/2 c. light cream
2 sprigs thyme
2 slices of bacon (save the bacon after you fry it because you'll use it for garnish)
6 c. chicken broth
3 c. water
1 T salt (more to taste)
2 t pepper (I use white pepper in white dishes)
4 scallions, diced (optional, for garnish)
sour cream (light, regular, fat-free- whichever you prefer) or creme fraiche (optional, for garnish)
Step one, cut a hole in the box... Oops, sorry. Just kidding. Actual step one, peel and chop the garlic and potatoes. Then wash and chop the leeks. Leeks can Over the years, I've learned to get all ingredients ready to go before you start cooking. This way, you won't be panicking as things are burning on the stove and you're still trying to get everything chopped and in the pan. Not that this has EVER happened to me of course.


Look at what a good little worker bee I am. A word about the leeks: most of the time, they collect unseen dirt in the outer layers. More than once have made the mistake of trying to slice them whole. Total fail. Turns out that it's nearly impossible to get the dirt out from tiny little rings of leek. (You won't use the top, dark green part of the leek, but the dirt usually manages to find its way further down the stalk). To combat that, after washing the leeks, I slice them in half and then peel back the outer layers just a hair and wash them again:
Now that everything's chopped, fry the bacon in the same pot you'll be using for the soup. The pots at our house range in size from small-ish to lobster pot and I figured everything wouldn't fit in the little guys, hence:
Once the bacon is browned to your desired level of crispness, (I like mine almost burnt but not quite), remove the bacon but leave the grease in the pot. Add the sliced leeks and garlic and cook on medium/med-low for about 7 minutes (until leeks are floppy). Then add the chopped potatoes, thyme, chicken broth, water, thyme, and cream. Bring to a boil and then turn down the heat to medium low and cook for about an hour (until the potatoes are tender- think mushy potato salad-consistency). If you find the soup getting too thick, add water or chicken broth in half cup increments to thin it out a bit.
Here's the soup cooking (at left). In real life, it wasn't nearly this yellow. Poor kitchen lighting and an iPhone camera flash contributed to this exotic color. Once the potatoes are tender, remove the sprigs of thyme (no worries if a few stray leaves have detached themselves). You now have two options. If you have an immersion blender (one of my favorite shower gifts from my pal LuckyClairo- and her darling mother Christmas Cele), now's your time to shine. I had been pining away for one of these for years and it has already revolutionized my soup making. Basically, it's a hand-held blender. And it will change your life. It's too bad I didn't capture a pic of myself smiling up a storm while using it. Ah well. Your second option is to use a regular blender. But fait attention, it's easy to get carried away and try to cram too much hot stuff into a blender at once. The steam rises up and the hot liquid will escape through the top if you aren't careful. To avoid this fate, only put 2-3 cups of liquid in the blender at a time (you'll blend several cups at a time and then return them to the pot, and blend another few cups and so on until everything is blended to your liking- some like it chunky, some like it smooth). Also, while blending, always put pressure on the lid with a dish towel (just to make sure the lid doesn't leak or pop off and you aren't caught off guard trying to put it back on with your bare hands). Add salt and pepper (add more to taste. I used low sodium chicken broth and added a lot of salt back in to give the soup more flavor). Incidentally, did you know that peppercorns grow on trees and look like this in nature? Saw that on Alton Brown recently and it was totally news to me. At my parents' house, we always used Tony Chachere's creole seasoning in our potato soup and it was delicious- so if you have that handy, give it a go. (Also, we pronounced it "Chaach-erees", which I'm pretty sure is incorrect).
 Serve with whichever toppings you prefer. I used chopped scallions, chopped bacon (remember that from the beginning), a dollop of sour cream (gives it a great tanginess), and a little hot sauce. Grated cheddar is also fantastic on top. As are chives. Basically anything you'd want on a baked potato. Enjoy :)
In any event, I can- and will, keep the potato recipes coming. Let's say that you didn't have any russet potatoes on hand to make pommes frites last week but you do have yukon golds (or even those basic, all purpose potatoes). A great way to use some up is in a potato-leek soup- one of the most delicious, belly warming meals around. There are a number of ways to make this soup using a variety of different ingredients (so feel free to poke around online for modifications). To make my potato-leek soup, I adapted this pretty basic recipe from Epicurious, my go-to recipe/meal idea website since college. The leftovers will grow more flavorful overnight but this will make you an absolutely ENORMOUS batch of soup. However, if you aren't cooking for a tiny army (or even a grown-up sized one), you might want to halve the recipe.
Potato Leek Soup
Serves 12
2 leeks, washed and sliced
3 lbs Yukon Gold potatoes, peeled and diced
3 cloves garlic, minced
1/2 c. light cream
2 sprigs thyme
2 slices of bacon (save the bacon after you fry it because you'll use it for garnish)
6 c. chicken broth
3 c. water
1 T salt (more to taste)
2 t pepper (I use white pepper in white dishes)
4 scallions, diced (optional, for garnish)
sour cream (light, regular, fat-free- whichever you prefer) or creme fraiche (optional, for garnish)
Step one, cut a hole in the box... Oops, sorry. Just kidding. Actual step one, peel and chop the garlic and potatoes. Then wash and chop the leeks. Leeks can Over the years, I've learned to get all ingredients ready to go before you start cooking. This way, you won't be panicking as things are burning on the stove and you're still trying to get everything chopped and in the pan. Not that this has EVER happened to me of course.


Look at what a good little worker bee I am. A word about the leeks: most of the time, they collect unseen dirt in the outer layers. More than once have made the mistake of trying to slice them whole. Total fail. Turns out that it's nearly impossible to get the dirt out from tiny little rings of leek. (You won't use the top, dark green part of the leek, but the dirt usually manages to find its way further down the stalk). To combat that, after washing the leeks, I slice them in half and then peel back the outer layers just a hair and wash them again:
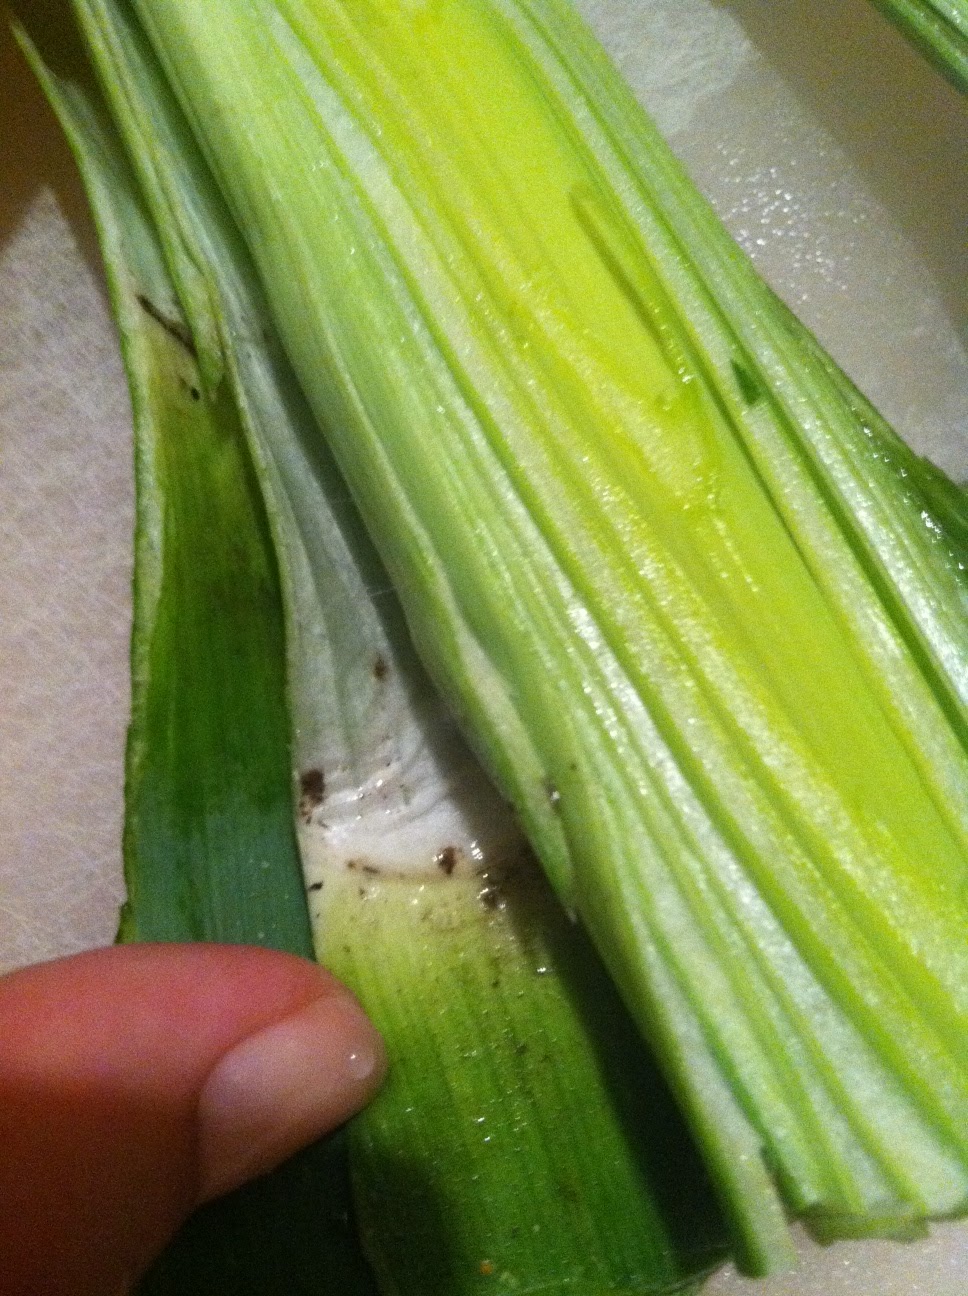 |
| Ick |
 |
| This should solve the problem |
Now that everything's chopped, fry the bacon in the same pot you'll be using for the soup. The pots at our house range in size from small-ish to lobster pot and I figured everything wouldn't fit in the little guys, hence:
 |
| Certainly not winning any prizes for bacon photography |
 |
 |
| Total dream |

Thursday, October 6, 2011
When life gives you potatoes....
make pommes frites! Duh. That's Freedom Fries to you, silly americains. Remember that whole situation? When the House cafeteria replaced "freedom" for "French" on their fries and toast. I was living in France at the time and one of the downsides (aside from living with a host mother who, in addition to being crazy, fed me frozen fish and imitation crab meat while my friends sampled homemade baeckeoffe and choucroute and flammekeuche and all sorts of Alsatian delicacies with their host families) was actually having multiple serious conversations with the French on the freedom vs. french debacle. (And if you're looking to try any Alsatian delicacies in Boston, check out Sandrine's, an Alsatian restaurant in Harvard Square). On top of that, being American made me seemingly irresistible to people wanting to discuss Monsieur Booosh and his politics, often in bars. (#1 on my list of intense dislikes: talking politics when drinking. I know it's tempting, but just. don't). When I got back to the States (yes, you can call it that when you've been abroad or are talking to someone who's also been abroad and yes sometimes I know it sounds pretentious but sorry I can't help it) I got a huge kick out of how my fellow Americans handled the situation, chanting U-S-A at every possible opportunity.
Anyways, where were we? Right, french fries. (One more thing- do you realize that it was three years before the House cafeteria served french fries again? Ouch, America).
That aside, it's a pretty well-known fact that french fries, which were actually invented in Belgium, are one of the most delicious snacks in all of snackdom. However, short of buying a deep fryer, it can be tricky to recreate delicious fries at home. Especially healthy ones. Tipsy Turvy to the rescue!
Homemade Baked French Fries
(serves 4)
5 large russet potatoes (russet potatoes have the perfect consistency for fries), well scrubbed
2T olive oil
1 1/2t sea salt (I prefer the taste of this to standard table salt)
pepper to taste
Preheat oven to 400 degrees.
Note: this is a basic recipe for fries. If you're feeling extra fancy, additional flavor options include:
Put the bowl of potatoes/water in the fridge and let sit for at least an hour (and up to 8, though I never plan far enough in advance to need that much time). Take fries out of the fridge, drain the water, rinse and pat dry. (If you're short on time, here's a quick version of this step: boil a pot of water and add the fries. Cook for 10 minutes, drain, rinse and pat dry, then continue to the next step). In a bowl, toss the taters with the olive oil, salt and pepper and put on a baking sheet in a single layer, like so:
You've already preheated the oven to 400, so pop the fries in for 25 minutes. Cooking time will vary based on your oven- ours is kind of all over the place. At 25 minutes, take the fries out and turn them over with a spatula to get them crispy on both sides. Put fries back in the oven and cook for 10 extra minutes (until crispy but not burnt). Et voila!
Serve and enjoy, preferably with a homemade burger. Yum!

Anyways, where were we? Right, french fries. (One more thing- do you realize that it was three years before the House cafeteria served french fries again? Ouch, America).
That aside, it's a pretty well-known fact that french fries, which were actually invented in Belgium, are one of the most delicious snacks in all of snackdom. However, short of buying a deep fryer, it can be tricky to recreate delicious fries at home. Especially healthy ones. Tipsy Turvy to the rescue!
Homemade Baked French Fries
(serves 4)
5 large russet potatoes (russet potatoes have the perfect consistency for fries), well scrubbed
2T olive oil
1 1/2t sea salt (I prefer the taste of this to standard table salt)
pepper to taste
Preheat oven to 400 degrees.
Note: this is a basic recipe for fries. If you're feeling extra fancy, additional flavor options include:
- 1t chopped rosemary
- 1t Tony Chachere's cajun seasoning
- or top with finely grated Parmesan cheese.
 | |||
| Cut fries taking a bath |
 |
| Almost there |
 |
| Excuse the poor lighting- our kitchen is beyond dark! |

U-S-A! U-S-A! U-S-A!
Tuesday, October 4, 2011
How to satisfy a craving for Chinese food without calling for take-out
(Now with pictures!!)
As the daughter of two parents born and raised in the Midwest, ethnic cuisine at our house usually translated to exotic dishes like bratwurst, German potato salad, spaghetti and any dish involving noodles. (As a disclaimer, I love my mom's cooking. She is-and always has been a fabulous cook and an incredibly gracious entertainer, even as she's still working on dinner when the guests show up).
Nowadays when I visit my parents in Georgia, my mom always asks me what meals I'd like while I'm home. And invariably, I always request her stir fry. I'm not sure where she got the initially got the recipe for this dish but I do know that it's been a comfort food for me since elementary school. (Yes, I ate lots of veggies in elementary school. That sweet mother o' mine pioneered the chef salad as a lunch long before salads, chef or otherwise were en vogue. You can probably imagine how confused my classmates were in 1988 when I pulled out Tupperware containers of salad and dressing. Embarrassing for sure, but at least it was less embarrassing than a stinky but delicious egg salad sandwich wrapped in wax paper).
What follows here is my take on my mom's stir fry recipe, a healthy chicken and veggie version of a dish ubiquitous to many a neighborhood Chinese restaurant. I've made this recipe for friends and family since college and it's evolved a bit over the years from the original recipe (which isn't so much an actual recipe as it is an experiment in adding ingredients, seasoning and tasting until it's just right). Keep in mind that I'm not making any claims of authenticity (by any means), but you can easily modify this recipe to fit your take-out cravings.
Mr Turvy, for instance, loves his stir fry with pineapple. If you're a fan of this sweet/savory combo too, try adding 3/4 c chopped pineapple (fresh or canned and drained). When I made this stir fry last week, I used what I had on hand in our fridge and pantry. When I plan ahead a little better, I love to include 1.5c bean sprouts, baby corn (1 can, drained) and sliced water chestnuts (1 small can, drained). Obviously this is a lot of ingredients to cram into one pot, wok, etc, so you'll probably want to pick and choose your favorite ingredients.
First things first, you'll need to round up your ingredients. When I make this, the bulk of my time is spent chopping vegetables-so if you're short on time after work, do your chopping a day ahead while you're watching the Kardashians or something. Don't lie- everyone watches the Kardashians. It's hard to avoid them, really, since E! runs re-runs about six times a day.
Chicken and vegetable stir fry
Serves 4-6
2 boneless chicken breasts, chopped and seasoned with salt and pepper
1/2 of a medium yellow onion, diced
1/2 of a green or red pepper, diced
2 garlic cloves, peeled and minced
1 head (or crown) of broccoli, chopped (I use crowns because I'm not crazy about broccoli stems and yes I know it's weird and I need to get over it- maybe someday)
1/4 lb (two handfuls-regular sized handfuls, not super sized, Caroline-esque handfuls) of sugar snap peas, trimmed at ends
2T soy sauce
1/2t red pepper flakes (in lieu of red pepper you can use Sriracha or a spice mixture called sambal oelek to add heat-or if you don't want heat, leave it out entirely)
1T sweet chili sauce (I found mine at Trader Joes but if you don't have any on hand you can substitute it for teriyaki sauce or a hoisin sauce for a taste that's sweeter and smokier)
2T olive oil
2T sesame (or peanut) oil
1/4c chicken broth
3 chopped scallions, for garnish (optional)
Rice (brown or white) or rice noodles, cooked according to directions on the package
1/2c chicken broth
1T cornstarch
2T water
Chop the peppers, onions, and garlic and set aside. Trim the ends of the sugar snap peas and set aside. (As the chicken cooks, you'll have time to chop the vegetables but I like to get the chopping out of the way en avance just in case I get distracted while I'm cooking- not entirely uncommon, unfortunately!) Chop the chicken and season it with salt and pepper (I usually aim for 1", bite sized pieces since I don't think you should have to use a knife when you eat stir fry).
In a saucepan or wok, heat 2T oil (I use a mixture of 1T olive oil and 1T sesame oil) until it shimmers.
Add the seasoned chicken and cook for 4-5 minutes per side (until browned)on med-high heat. Be careful of the oil spattering as you put the chicken into the hot pan. Boneless chicken tends to give off water as it cooks, so don't be alarmed-you aren't doing anything wrong.
Push the browned chicken to the outside edges of the pan, add 1T olive oil and add the chopped yellow onion, pepper and garlic. Just scootch everything over a bit...
Stir occasionally until onions are translucent (shiny and clear-ish)- about 4 or 5 minutes. If you're serving this dish over rice and your rice takes 20 minutes to cook, start it now so that the stir fry and rice will be ready to serve at the same time.
Move the peppers and onions to the sides of the pan to make room for the broccoli and sugar snap peas. Turn heat down to medium and add peas and broccoli.
Cook for 2-3 mins until both are bright green. Add the soy sauce, red pepper flakes and 1/4c chicken broth and scrape the pan. Make sure that you're using a wooden or heavy plastic spoon to scrape the pan as metal and stainless steel will damage the finish.
Add the sweet chili sauce and stir.
Add 1/2c chicken broth to the stir fry and reduce heat to medium low. In a small cup or bowl, stir together 2T water and 1T cornstarch until the cornstarch is dissolved (this helps to thicken your sauce). Add the mixture to the stir fry and simmer for 5-6 minutes until sauce thickens. Season sauce with salt and pepper, to taste. Serve over cooked rice or rice noodles and garnish with chopped scallions. Then pat yourself on the back because you've just fixed yourself a delicious Chinese feast and you won't feel gross afterwards.
I typically make enough of this for leftovers. Y'all have probably noticed that when you reheat cooked chicken in the microwave, it gets sort of creepily rubbery and hard at the same time. Gross, right? You can avoid this fate by reheating it in an oven-safe bowl or baker at 350 for about 10 minutes.
If you attempt this, let me know how it turns out. What do you like in your stir fry?
As the daughter of two parents born and raised in the Midwest, ethnic cuisine at our house usually translated to exotic dishes like bratwurst, German potato salad, spaghetti and any dish involving noodles. (As a disclaimer, I love my mom's cooking. She is-and always has been a fabulous cook and an incredibly gracious entertainer, even as she's still working on dinner when the guests show up).
Nowadays when I visit my parents in Georgia, my mom always asks me what meals I'd like while I'm home. And invariably, I always request her stir fry. I'm not sure where she got the initially got the recipe for this dish but I do know that it's been a comfort food for me since elementary school. (Yes, I ate lots of veggies in elementary school. That sweet mother o' mine pioneered the chef salad as a lunch long before salads, chef or otherwise were en vogue. You can probably imagine how confused my classmates were in 1988 when I pulled out Tupperware containers of salad and dressing. Embarrassing for sure, but at least it was less embarrassing than a stinky but delicious egg salad sandwich wrapped in wax paper).
What follows here is my take on my mom's stir fry recipe, a healthy chicken and veggie version of a dish ubiquitous to many a neighborhood Chinese restaurant. I've made this recipe for friends and family since college and it's evolved a bit over the years from the original recipe (which isn't so much an actual recipe as it is an experiment in adding ingredients, seasoning and tasting until it's just right). Keep in mind that I'm not making any claims of authenticity (by any means), but you can easily modify this recipe to fit your take-out cravings.
Mr Turvy, for instance, loves his stir fry with pineapple. If you're a fan of this sweet/savory combo too, try adding 3/4 c chopped pineapple (fresh or canned and drained). When I made this stir fry last week, I used what I had on hand in our fridge and pantry. When I plan ahead a little better, I love to include 1.5c bean sprouts, baby corn (1 can, drained) and sliced water chestnuts (1 small can, drained). Obviously this is a lot of ingredients to cram into one pot, wok, etc, so you'll probably want to pick and choose your favorite ingredients.
First things first, you'll need to round up your ingredients. When I make this, the bulk of my time is spent chopping vegetables-so if you're short on time after work, do your chopping a day ahead while you're watching the Kardashians or something. Don't lie- everyone watches the Kardashians. It's hard to avoid them, really, since E! runs re-runs about six times a day.
 |
| Something tasty to look forward to! |
Chicken and vegetable stir fry
Serves 4-6
2 boneless chicken breasts, chopped and seasoned with salt and pepper
1/2 of a medium yellow onion, diced
1/2 of a green or red pepper, diced
2 garlic cloves, peeled and minced
1 head (or crown) of broccoli, chopped (I use crowns because I'm not crazy about broccoli stems and yes I know it's weird and I need to get over it- maybe someday)
1/4 lb (two handfuls-regular sized handfuls, not super sized, Caroline-esque handfuls) of sugar snap peas, trimmed at ends
2T soy sauce
1/2t red pepper flakes (in lieu of red pepper you can use Sriracha or a spice mixture called sambal oelek to add heat-or if you don't want heat, leave it out entirely)
1T sweet chili sauce (I found mine at Trader Joes but if you don't have any on hand you can substitute it for teriyaki sauce or a hoisin sauce for a taste that's sweeter and smokier)
2T olive oil
2T sesame (or peanut) oil
1/4c chicken broth
3 chopped scallions, for garnish (optional)
Rice (brown or white) or rice noodles, cooked according to directions on the package
1/2c chicken broth
1T cornstarch
2T water
Chop the peppers, onions, and garlic and set aside. Trim the ends of the sugar snap peas and set aside. (As the chicken cooks, you'll have time to chop the vegetables but I like to get the chopping out of the way en avance just in case I get distracted while I'm cooking- not entirely uncommon, unfortunately!) Chop the chicken and season it with salt and pepper (I usually aim for 1", bite sized pieces since I don't think you should have to use a knife when you eat stir fry).
In a saucepan or wok, heat 2T oil (I use a mixture of 1T olive oil and 1T sesame oil) until it shimmers.
 |
| I tried to take a picture of the shimmering pan, but alas, no dice. |
Add the seasoned chicken and cook for 4-5 minutes per side (until browned)on med-high heat. Be careful of the oil spattering as you put the chicken into the hot pan. Boneless chicken tends to give off water as it cooks, so don't be alarmed-you aren't doing anything wrong.
 |
| Watery chicken? Hakuna matata |
Push the browned chicken to the outside edges of the pan, add 1T olive oil and add the chopped yellow onion, pepper and garlic. Just scootch everything over a bit...
 |
| Yup, just like that |
Move the peppers and onions to the sides of the pan to make room for the broccoli and sugar snap peas. Turn heat down to medium and add peas and broccoli.
 |
| As an aside, this pot is way too crowded. Using a wok will really help you cut down on cooking time since everything has more room to spread out |
Cook for 2-3 mins until both are bright green. Add the soy sauce, red pepper flakes and 1/4c chicken broth and scrape the pan. Make sure that you're using a wooden or heavy plastic spoon to scrape the pan as metal and stainless steel will damage the finish.
Add the sweet chili sauce and stir.
 |
| Thank you, Trader Joes, for providing me with inexpensive goodies to use in my cooking |
I typically make enough of this for leftovers. Y'all have probably noticed that when you reheat cooked chicken in the microwave, it gets sort of creepily rubbery and hard at the same time. Gross, right? You can avoid this fate by reheating it in an oven-safe bowl or baker at 350 for about 10 minutes.
If you attempt this, let me know how it turns out. What do you like in your stir fry?
Subscribe to:
Posts (Atom)